Authentic Mexican Beef Tamale Recipe

I still remember standing in my abuela’s kitchen at age eight, watching her hands move with practiced grace as she spread masa across corn husks. The steam rose from the enormous pot, and I knew—somehow, even then—that this wasn’t just cooking. This was love made edible, tradition wrapped in corn silk. Today, as a registered dietitian, I’ve learned that those childhood moments taught me something clinical nutrition textbooks couldn’t: food that nourishes the body must first feed the soul. That’s why I’m sharing my authentic Mexican beef tamale recipe as your ultimate meal prep strategy. Make this once on Sunday, and you’ll eat like you just stepped out of a Mexican kitchen every single day this week. Pair these beauties with Easy Mexican Slaw with Cilantro Lime Dressing for a complete, nutritionally balanced plate that takes minutes to assemble.
Authentic Mexican Beef Tamale Recipe Meal Prep: Cook Once, Eat All Week
The first time I truly understood meal prep wasn’t from a nutrition conference—it was from watching my mother manage a household of six on a dietitian’s schedule. She’d spend one Saturday afternoon making enough tamales to feed our family for half the week, and suddenly, dinner wasn’t stressful anymore. It was waiting for us, ready to be reheated with love. Fast forward twenty years, and I realize that moment shaped how I approach feeding myself and my clients. Tamales are the ultimate meal prep food because they’re authentic, they’re satisfying, and they actually taste better on day three than they do fresh from the steamer. That’s not luck—that’s chemistry. The flavors deepen as they meld together overnight, the texture becomes more tender, and you’re eating real food with ingredients you can actually pronounce.
Why This Recipe Is Perfect for Meal Prep
- Time efficiency that changes your week – One four-hour cooking session on Sunday yields 24-32 tamales, giving you breakfast, lunch, or dinner options for 5-6 days with zero weeknight cooking stress.
- Exceptional storage and flavor development – Unlike many dishes that decline after two days, tamales actually improve in the refrigerator as the beef filling’s flavors penetrate the masa. They hold perfectly for 6-7 days when properly stored.
- Incredible versatility across every meal – Serve them hot for breakfast with fresh salsa, cold for lunch in a grain bowl, or at dinner alongside seasonal vegetables. One batch becomes five completely different meals without feeling repetitive.
Your Weekly Meal Plan With This Recipe
Here’s exactly how I structure my week around one big tamale-making session. This isn’t theoretical—this is what I actually do Monday through Friday, and it’s transformed how I manage my time and nutrition.
- Monday Breakfast – Two warm tamales with a fried egg and fresh lime wedge. The beef filling provides complete protein, while the egg adds richness and extra nutrients.
- Tuesday Lunch – Three tamales served room temperature over a bed of cilantro lime lettuce with black beans. Quick assembly, no reheating needed if you’re away from the office.
- Wednesday Dinner – Two tamales with roasted seasonal vegetables and a small portion of authentic Mexican rice. The familiarity of the main dish means you have space to experiment with veggie sides.
- Thursday Breakfast – One tamale crumbled into scrambled eggs with cheese and peppers—essentially a deconstructed tamale breakfast burrito.
- Friday Dinner – The final tamales served with my Vegetarian Chicken Stock as a warming broth base, creating a completely different experience from earlier in the week.
The Ingredients – Scaled for a Full Week
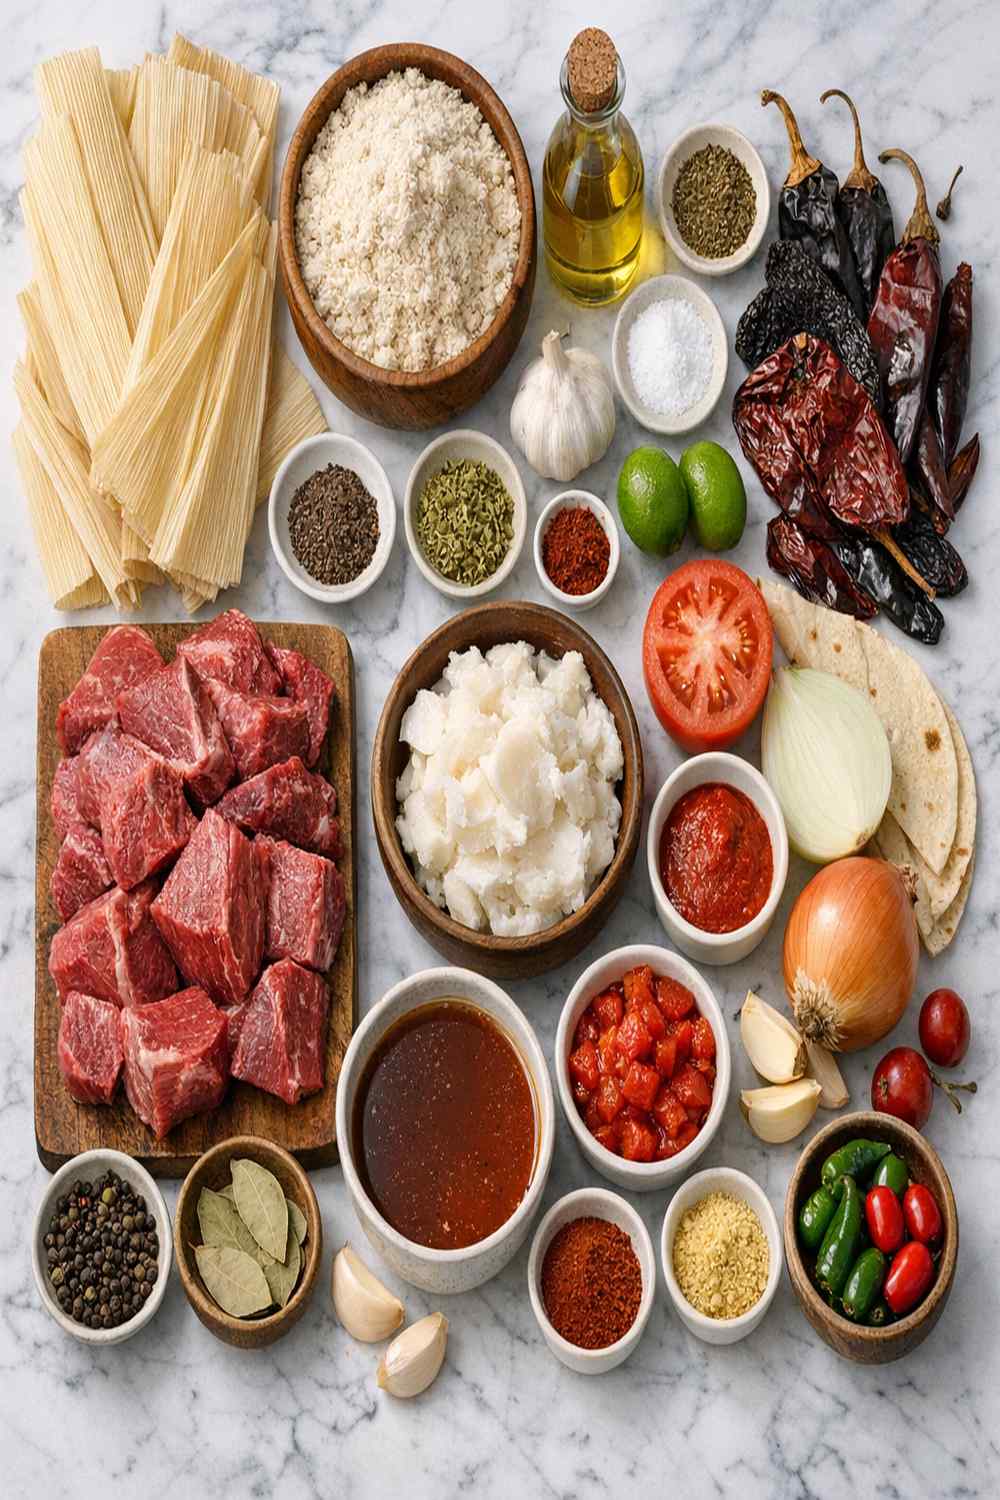
I’ve scaled this recipe to create 28-32 tamales, perfect for a family of four eating them 5-6 times throughout the week. All ingredients store beautifully when you follow my guidelines below. This isn’t just a shopping list—each note is from my professional experience watching which ingredients hold up and which ones don’t.
For the Masa Dough
- 1⅓ cups rendered lard or vegetable shortening (room temperature makes beating easier and creates better texture)
- 4 cups masa harina flour (buy from the Mexican section or a Latin market; it must be finely ground corn flour, never cornmeal)
- 1 teaspoon ground cumin (adds warmth without overpowering the beef flavor)
- 2 teaspoons baking powder (this creates the tender, slightly fluffy texture authentic tamales should have)
- 1 teaspoon fine sea salt (adjust slightly based on broth saltiness)
- 3 cups beef, chicken, or vegetable broth (warm or room temperature; homemade tastes best but quality store-bought works perfectly)
For Assembly and Cooking
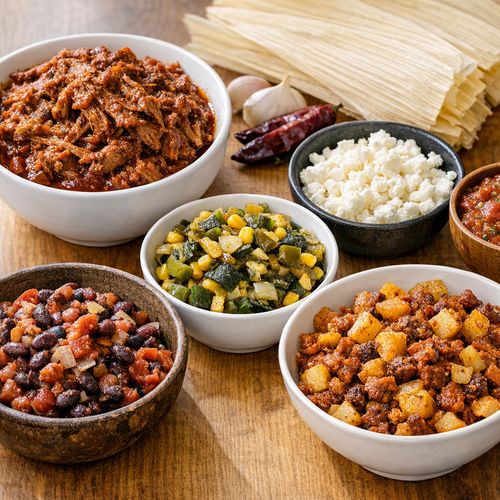
- 1½ cups bean and cheese filling (refried beans mixed with Oaxaca or mozzarella cheese)
- 8 ounces dried corn husks (soak and store properly so they don’t crack—these are essential and worth buying quality)
- Extra water for steaming (approximately 4-6 cups depending on your steaming method)
- 1-2 cups salsa verde chicken filling (optional second filling for variety)
- 2-3 cups red chili beef filling (slow-cooked beef in a deep red chile sauce, prepared separately)
- ½ teaspoon smoked paprika (adds depth and a subtle smokiness that elevates store-bought broth)
The Meal Prep Process: How to Make Authentic Mexican Beef Tamale Recipe in Bulk
I’ve organized this as a system, not just a recipe. The efficiency comes from understanding which steps can overlap, which components need your attention, and where you can save yourself an hour of wasted time. Read through completely before starting, and set up your kitchen like a professional kitchen—mise en place, we call it. Everything in its place before you begin.
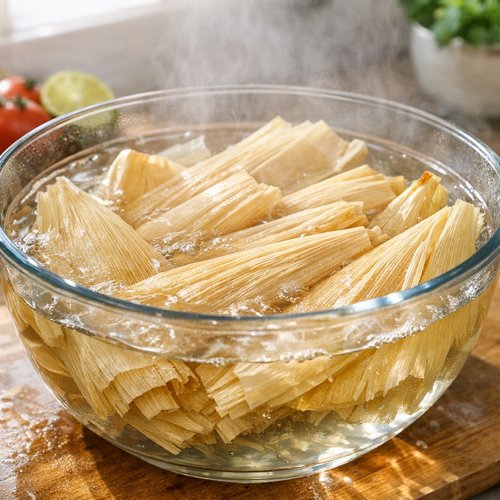
Step 1: Prepare Your Corn Husks (30 minutes active, mostly waiting)
Fill a large bowl or your kitchen sink with very hot water—as hot as your tap water goes, ideally around 140°F. Submerge all 8 ounces of dried corn husks and weight them down with a plate so they stay underwater. Set a timer for 30 minutes. While they soak, you’re going to prepare your fillings (if making them fresh) and set up your workspace. This is the perfect time to identify your three filling options, because once the husks are ready, you won’t have much idle time.
Step 2: Prepare Your Fillings in Advance (varies, ideally done the day before)
This is where meal prep wisdom comes in: make your fillings the day before if you can. Seriously. Cold fillings are easier to work with, and you’ll move faster during the assembly phase. For red chili beef, slow-cook shredded beef in a deep red chile sauce for richness and authenticity. For salsa verde chicken, poach chicken breasts in salsa verde broth. For the bean and cheese filling, mash refried beans and mix with shredded cheese. Portion each filling into separate containers so you can grab what you need during assembly. My professional tip: keep each filling slightly warm (not hot) during assembly—it spreads more easily onto the masa.
Step 3: Beat the Lard Until Fluffy (10-15 minutes)
Use an electric mixer for this step—your arm will thank you. Place the room-temperature lard into a large mixing bowl and beat on medium-high speed with 2 tablespoons of your warm broth. Beat for 3-5 minutes until the mixture becomes pale, fluffy, and almost doubled in volume. This is crucial. The air you’re incorporating here is what makes tamales light and tender instead of dense. You should see visible texture change—it’ll go from solid fat to mousse-like consistency. This is non-negotiable for authentic texture.
Step 4: Combine Dry Ingredients and Mix (5 minutes)
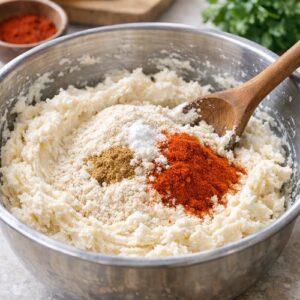
In a separate bowl, whisk together the masa harina flour, baking powder, salt, cumin, and smoked paprika. Add this dry mixture to your fluffy lard and beat on medium-high speed for 2-3 minutes until well combined. The mixture will be crumbly at this point—that’s exactly what you want. Don’t panic; we’re about to add liquid to develop it into dough.
Step 5: Create the Perfect Dough Consistency (8-10 minutes)
Add your broth very slowly, a few tablespoons at a time, while beating on high speed. This isn’t like bread dough. You want the final consistency to spread like creamy peanut butter—soft, pliable, slightly sticky to the touch, but not wet. Keep beating after each addition. This whole process should take 8-10 minutes of beating on high. The extended beating develops the gluten in the masa, creating that tender yet slightly springy texture. Test the consistency by dropping a small spoonful into cold water—it should float immediately when fully beaten. If it sinks, keep beating. Once correct, cover the mixing bowl with a damp paper towel to prevent it from drying out as you work.

Step 6: Assemble Your Tamales (90-120 minutes for 28-32 tamales)
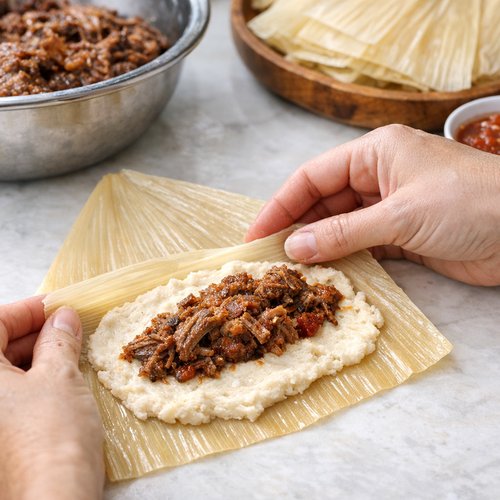
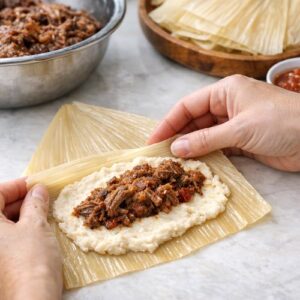
Now for the meditative part. Remove husks from the water one at a time—they tear easily when wet. Lay each husk glossy side up on your counter with the wide end facing the top. Scoop approximately ¼ cup of masa dough onto the center-top portion of the husk. Here’s my professional hack: lay a piece of plastic wrap over the dough and use your hands to gently press and spread the masa into a thin, even layer about ¼ inch thick. This keeps your hands clean and gives you better control than trying to spread with a knife. Keep the dough on the top half of the husk, leaving the bottom wide and clear for folding.
Remove the plastic wrap. Place 1-2 tablespoons of your chosen filling in a line down the center of the dough layer. Resist the urge to overfill—too much filling makes folding difficult and creates uneven cooking. Fold one long side of the husk over the filling, then fold the other long side over it, slightly overlapping like closing a brochure. Fold the tapered bottom of the husk upward. The open end stays at the top. If you’re using multiple fillings and want to track them, you can tie a thin strip of corn husk around each tamale, but it’s optional.
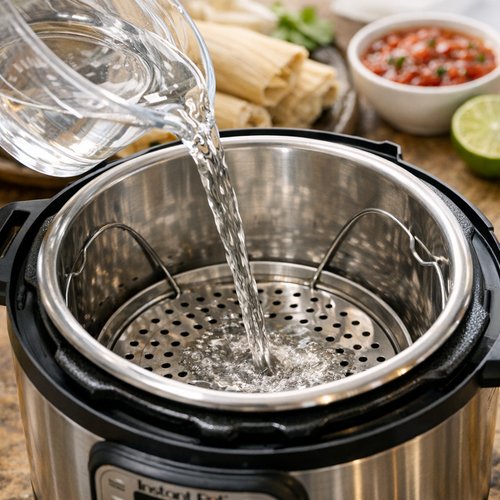
Step 7: Set Up Your Steaming System (10 minutes)
You have two excellent options here: a traditional steamer pot or an Instant Pot. Both work beautifully. Pour about 1 cup of water into your Instant Pot, or 3-4 cups into a steamer pot—you want water below the steaming rack but not touching the tamales themselves. Lay down a layer of extra soaked corn husks or crumpled parchment paper on the steaming rack to keep the tamales from falling through or making contact with boiling water. This prevents a common beginner mistake: soggy bottoms.
Step 8: Load and Steam (45-60 minutes for steamer pot, 25 minutes for Instant Pot)
Stand your assembled tamales upright with the open end facing up, packed snugly enough that they support each other but not so tightly that steam can’t circulate. For a stovetop steamer: bring water to a rolling boil, then reduce to a simmer and steam for 45 minutes to 1 hour. The masa should pull away cleanly from the husk when done. For an Instant Pot: cook on manual/high pressure for 25 minutes, allow natural pressure release for 10 minutes, then quick release. Both methods work equally well—choose based on your equipment and time preference.
Step 9: Test for Doneness (5 minutes)
This is the step that separates perfectly cooked tamales from slightly underdone ones. Carefully remove one tamale from the steamer and let it cool for 1-2 minutes. Try to pull the corn husk away from the masa. If the husk pulls away cleanly and the dough doesn’t look wet or sticky, you’re done. If there’s still visible moisture or the dough sticks to the husk, steam for 5-10 minutes longer and retest. Undercooked tamales are disappointing; overcooked ones are still delicious but slightly drier. I always err on the side of a few extra minutes.
Step 10: Cool Before Storage (30-60 minutes)
Remove all tamales from the steamer and let them rest in the open air for 30-60 minutes before refrigerating. This prevents condensation from making them soggy. They’ll still be quite warm after 30 minutes, which is fine—just ensure they’re not piping hot when they go into the refrigerator, or they’ll create steam that promotes moisture buildup.

Storage and Organization System
- Glass storage containers with silicone lids – I prefer these over plastic because they don’t absorb odors and create better seals. Stack tamales standing upright if possible, or lay them flat in a single layer if space allows. Don’t stack them more than 3-4 high or the bottom ones compress.
- Portion strategy for maximum flexibility – Store in groups of 2-3 tamales per container rather than one large container. This lets you grab exactly what you need without opening the whole batch and releasing moisture. If you made three fillings, label each container clearly so you know what you’re grabbing.
- Color-coded tape system – Use a permanent marker and colored tape. I use red tape for beef, green for salsa verde, yellow for bean and cheese. Label the date made (not just the day) and the filling type. This prevents confusion at 7 AM when you’re groggy and just want breakfast.
How to Reheat Without Losing Quality
Microwave method (fastest, 2-3 minutes): Place one tamale on a microwave-safe plate, wrap loosely in a damp paper towel, and microwave on 50% power for 2-3 minutes. The damp towel prevents the corn husk from drying out. The reduced power level heats evenly without creating hot spots.
Stovetop method (best for flavor, 5-8 minutes): Remove the corn husk and place the tamale in a dry skillet over medium heat for 3-4 minutes per side. This creates gentle heat that warms through without drying the exterior. Optional: add a tiny splash of water to the pan and cover with a lid for the final 2 minutes for extra moisture. This is my preferred method when I have time.
Oven method (best for batch reheating, 15-20 minutes): Preheat oven to 350°F. Arrange tamales on a baking sheet, cover loosely with foil, and warm for 15-20 minutes. This method is perfect when reheating 4+ tamales at once. Remove foil for the last 3 minutes if you want any slight crisping on the husk edges.
Instant Pot method (gentle and quick, 8-10 minutes): Add 1 cup water to the Instant Pot, place the trivet in, arrange tamales standing upright, and cook on high pressure for 8-10 minutes with quick release. This reheats from the inside out beautifully without drying the exterior.
Can I Freeze Authentic Mexican Beef Tamale Recipe?
Yes, absolutely. Here’s my detailed freezing protocol because I’ve tested every variable: freeze cooked tamales for up to three months with excellent quality retention. Let me walk you through this like we’re at my kitchen counter.
After the tamales have cooled to room temperature, place them in a single layer on a baking sheet and freeze for 2-3 hours until solid. This flash-freezing prevents them from sticking together. Once fully frozen, transfer into a gallon-sized freezer bag, remove as much air as possible, label with the date and filling type, and return to the freezer. Alternatively, you can layer them flat in a freezer container with parchment paper between layers.
To thaw and reheat from frozen: Remove from the freezer and either thaw overnight in the refrigerator, then reheat using any method above, or reheat directly from frozen using the microwave or Instant Pot methods (add 3-4 minutes to cooking time). Never try the stovetop method directly from frozen—the outside will heat too quickly while the inside remains cold.
Quality note: Tamales frozen in husks maintain texture better than those removed from husks before freezing. The husk acts as a protective barrier. If freezing longer than six weeks, the texture becomes slightly drier, though flavor remains excellent for the full three months.
Nutrition Information
Per tamale (approximate, based on USDA FoodData Central): 280-320 calories, 16-18g protein, 22-26g carbohydrates, 14-16g fat, 3-4g fiber, 420-480mg sodium. The beef filling provides complete protein with all nine essential amino acids, while the masa offers complex carbohydrates and B vitamins from the corn. One critical nutritional insight: the fat in tamales isn’t something to fear. The combination of lard (or vegetable shortening) with the corn creates an environment where fat-soluble vitamins—vitamins A, D, E, and K—absorb optimally. This is why traditional Mexican cooking uses fat so thoughtfully. You’re eating real food prepared the way human bodies have evolved to process it.
For a full week of eating tamales 5-6 times, you’re consuming approximately 1,400-1,600 calories from the tamales themselves, plus whatever sides and proteins you pair with them. They’re nutritionally balanced enough that they never feel heavy, yet satisfying enough that you stay full for 4+ hours. From a registered dietitian perspective, this is meal prep done right—real food, proper nutrition, zero processed ingredients in the tamales themselves.
What to Pair With Authentic Mexican Beef Tamale Recipe Throughout the Week
The beauty of tamales is that they’re complete on their own, but they’re versatile enough to shine alongside countless sides. Here’s how I prevent “tamale fatigue” across the week—making each meal feel fresh even though the main component stays the same.
- Monday breakfast – Fried egg with crispy edges and a squeeze of fresh lime. The egg’s richness plays beautifully with the beef’s depth.
- Tuesday lunch – Cold over fresh greens with cilantro lime dressing. Try my Easy Mexican Slaw with Cilantro Lime Dressing for crunch and brightness that contrasts the tamale’s density.
- Wednesday dinner – Alongside roasted poblano peppers and zucchini. The charred vegetable flavors complement the masa beautifully.
- Thursday breakfast – Crumbled into scrambled eggs with sharp cheddar. The tamale basically becomes part of the scramble, creating a textured, satisfying breakfast.
- Friday dinner – In a warm broth base with fresh cilantro and lime. This transforms them into soup-adjacent comfort food.
Expert’s Nutritional Insight: The Masa Magic
Here’s something most food bloggers miss: the masa flour used in tamales is traditionally treated with calcium hydroxide—a process called nixtamalization. This isn’t just tradition; it’s nutritional science. This ancient technique makes the corn’s niacin bioavailable, increases calcium absorption, and creates a more complete amino acid profile. When I recommend buying actual masa harina from a Mexican market rather than using regular cornmeal, I’m not being pretentious. You’re literally accessing nutrition that modern industrialized corn processing doesn’t offer. Your body recognizes this ancient preparation method and processes it better. That’s not marketing—that’s biochemistry.
Make-Ahead Guide: Strategic Preparation Timeline
Three days before cooking: Buy your ingredients. Get your masa harina from a Latin market if possible, your corn husks from the same place, and your beef from a quality butcher. Plan your fillings.
Two days before cooking: If making fillings from scratch, do it now. The beef benefits from overnight resting, and the flavors develop beautifully. Cool completely before refrigerating.
One day before cooking: Remove fillings from refrigerator 30 minutes before you’ll need them so they’re workable. Bring lard to room temperature (critically important for beating). Set up your workspace mentally—know where every ingredient will sit, where your steamer will go, where your assembled tamales will rest.
Cooking day: Allow 4-5 hours from start to storage. Start early enough that your tamales are completely cooled before bedtime, so you’re not steaming hot food into the refrigerator at 11 PM.
Common Mistakes to Avoid
Mistake 1: Insufficiently beaten lard. If your masa doesn’t spread smoothly or feels dense after cooking, you didn’t beat the lard long enough. Those 5+ minutes of beating aren’t optional—they’re creating the light texture. If you skip this, you end up with dense, heavy tamales that feel like masa bricks.
Mistake 2: Too much filling. The temptation to overstuff is real, and it ruins tamales every single time. Excess filling prevents the masa from sealing properly, breaks through during cooking, and makes the tamales taste unbalanced. One to two tablespoons is genuinely enough.
Mistake 3: Cooking at too high heat. If you use high boiling instead of a gentle simmer, the outside masa cooks too fast while the inside stays cold or wet. You need sustained, gentle steam for 45-60 minutes. A rolling boil means faster evaporation and uneven cooking.
Mistake 4: Packing tamales too tightly in the steamer. They need space for steam to circulate. If they’re crammed in shoulder-to-shoulder, the ones in the middle cook slower than the edges. Leave small gaps between each tamale.
Seasonal Variations: Adapt This Recipe Year-Round
Spring adaptation: Replace some beef filling with fresh poblano peppers and cheese. The bright green peppers add freshness when you’re transitioning from heavier winter eating. The flavors stay authentic while honoring spring’s lighter sensibility.
Summer adaptation: Make a fresh corn filling by combining fresh corn kernels, cotija cheese, and roasted jalapeños. It’s a lighter, brighter option when fresh corn is at its peak. Serve cold as a summer lunch.
Fall adaptation: Add smoked paprika and a pinch of cinnamon to the beef filling. It sounds unusual but plays beautifully with the masa. It’s warming without being heavy.
Winter adaptation: Stick with the classic beef or add a mole-inspired filling made with dark chocolate and chiles. Serve hot in a warming broth. Winter tamales lean into richness and depth.
Authentic Mexican Beef Tamale Recipe
Ingredients
Method
- Fill a large bowl or your kitchen sink with very hot water—as hot as your tap water goes, ideally around 140°F. Submerge all 8 ounces of dried corn husks and weight them down with a plate so they stay underwater. Set a timer for 30 minutes. While they soak, you're going to prepare your fillings (if making them fresh) and set up your workspace. This is the perfect time to identify your three filling options, because once the husks are ready, you won't have much idle time.

- This is where meal prep wisdom comes in: make your fillings the day before if you can. Seriously. Cold fillings are easier to work with, and you'll move faster during the assembly phase. For red chili beef, slow-cook shredded beef in a deep red chile sauce for richness and authenticity. For salsa verde chicken, poach chicken breasts in salsa verde broth. For the bean and cheese filling, mash refried beans and mix with shredded cheese. Portion each filling into separate containers so you can grab what you need during assembly. My professional tip: keep each filling slightly warm (not hot) during assembly—it spreads more easily onto the masa.
- Use an electric mixer for this step—your arm will thank you. Place the room-temperature lard into a large mixing bowl and beat on medium-high speed with 2 tablespoons of your warm broth. Beat for 3-5 minutes until the mixture becomes pale, fluffy, and almost doubled in volume. This is crucial. The air you're incorporating here is what makes tamales light and tender instead of dense. You should see visible texture change—it'll go from solid fat to mousse-like consistency. This is non-negotiable for authentic texture.

- In a separate bowl, whisk together the masa harina flour, baking powder, salt, cumin, and smoked paprika. Add this dry mixture to your fluffy lard and beat on medium-high speed for 2-3 minutes until well combined. The mixture will be crumbly at this point—that's exactly what you want. Don't panic; we're about to add liquid to develop it into dough.
- Add your broth very slowly, a few tablespoons at a time, while beating on high speed. This isn't like bread dough. You want the final consistency to spread like creamy peanut butter—soft, pliable, slightly sticky to the touch, but not wet. Keep beating after each addition. This whole process should take 8-10 minutes of beating on high. The extended beating develops the gluten in the masa, creating that tender yet slightly springy texture. Test the consistency by dropping a small spoonful into cold water—it should float immediately when fully beaten. If it sinks, keep beating. Once correct, cover the mixing bowl with a damp paper towel to prevent it from drying out as you work.
- Now for the meditative part. Remove husks from the water one at a time—they tear easily when wet. Lay each husk glossy side up on your counter with the wide end facing the top. Scoop approximately ¼ cup of masa dough onto the center-top portion of the husk. Here's my professional hack: lay a piece of plastic wrap over the dough and use your hands to gently press and spread the masa into a thin, even layer about ¼ inch thick. This keeps your hands clean and gives you better control than trying to spread with a knife. Keep the dough on the top half of the husk, leaving the bottom wide and clear for folding. Remove the plastic wrap. Place 1-2 tablespoons of your chosen filling in a line down the center of the dough layer. Resist the urge to overfill—too much filling makes folding difficult and creates uneven cooking. Fold one long side of the husk over the filling, then fold the other long side over it, slightly overlapping like closing a brochure. Fold the tapered bottom of the husk upward. The open end stays at the top. If you're using multiple fillings and want to track them, you can tie a thin strip of corn husk around each tamale, but it's optional.
- You have two excellent options here: a traditional steamer pot or an Instant Pot. Both work beautifully. Pour about 1 cup of water into your Instant Pot, or 3-4 cups into a steamer pot—you want water below the steaming rack but not touching the tamales themselves. Lay down a layer of extra soaked corn husks or crumpled parchment paper on the steaming rack to keep the tamales from falling through or making contact with boiling water. This prevents a common beginner mistake: soggy bottoms.
- Stand your assembled tamales upright with the open end facing up, packed snugly enough that they support each other but not so tightly that steam can't circulate. For a stovetop steamer: bring water to a rolling boil, then reduce to a simmer and steam for 45 minutes to 1 hour. The masa should pull away cleanly from the husk when done. For an Instant Pot: cook on manual/high pressure for 25 minutes, allow natural pressure release for 10 minutes, then quick release. Both methods work equally well—choose based on your equipment and time preference.

- This is the step that separates perfectly cooked tamales from slightly underdone ones. Carefully remove one tamale from the steamer and let it cool for 1-2 minutes. Try to pull the corn husk away from the masa. If the husk pulls away cleanly and the dough doesn't look wet or sticky, you're done. If there's still visible moisture or the dough sticks to the husk, steam for 5-10 minutes longer and retest. Undercooked tamales are disappointing; overcooked ones are still delicious but slightly drier. I always err on the side of a few extra minutes.
- Remove all tamales from the steamer and let them rest in the open air for 30-60 minutes before refrigerating. This prevents condensation from making them soggy. They'll still be quite warm after 30 minutes, which is fine—just ensure they're not piping hot when they go into the refrigerator, or they'll create steam that promotes moisture buildup.

Nutrition
Tried this recipe?
Let us know how it was!FAQs
Can I make the dough and assemble tamales the next day?
Yes, but with care. Make the dough and store it in an airtight container in the refrigerator for up to 2 days. When you’re ready to assemble, let it come to room temperature (1-2 hours) so it spreads smoothly. Cold dough is stiff and tears the corn husks. If you’re short on time, I recommend making dough and fillings on day one, assembling and freezing raw tamales on day two, then steaming on day three. Raw tamales freeze beautifully for up to two months, then steam directly from frozen (add 15-20 minutes to cooking time).
What’s the difference between lard and vegetable shortening?
Authentic tamales use rendered lard for flavor and texture. Lard produces a lighter, more tender crumb and adds traditional flavor. Vegetable shortening works well for texture but lacks lard’s subtle richness. If using vegetable shortening, I recommend adding ½ teaspoon of cumin to compensate. Both create excellent tamales—this is preference and dietary choice, not a quality issue.
Can I use a food processor instead of an electric mixer?
You technically can, but I don’t recommend it. Electric mixers incorporate air evenly and give you beating control. Food processors process ingredients but don’t incorporate air the same way. You might end up with denser tamales. If a mixer truly isn’t available, beat the lard by hand with a wooden spoon for 8-10 minutes until very fluffy—yes, really. Your arm will get a workout, but the tamales will be perfect.
How do I prevent corn husks from tearing when handling wet husks?
This is a handling technique issue. Remove husks from water one at a time and gently pat them dry with a clean kitchen towel before assembling. Wet husks are fragile—treat them like they’re precious. If a husk tears, layer two slightly overlapping husks together as your wrapper. Also, ensure your corn husks aren’t too old; very old, brittle husks tear regardless. Buy from markets with good turnover.
What water ratio do I use for steaming with my specific steamer?
The golden rule: water should come to ½ inch below the steaming rack, never touching the tamales themselves. For most 4-6 quart steamers, this is 3-4 cups. For Instant Pots, use exactly 1 cup. Put the water in, place the trivet, then check the level. Better to measure once and know than to guess and end up with soggy tamales or dried-out ones.
More Meal Prep Recipes
- Vegetarian Chicken Stock – A homemade broth base for soups and braising that stores beautifully and forms the foundation of countless other meals.
- Easy Mexican Slaw with Cilantro Lime Dressing – A bright, crunchy side that pairs perfectly with tamales and stays fresh for 5 days refrigerated.
- Aldi Sweet Potato Casserole Recipe – A seasonal side dish that reheats beautifully and satisfies alongside any protein.
You’re standing at the threshold of taking back control of your week. This isn’t about restriction or deprivation—it’s about choosing to feed yourself with intention, with authenticity, with flavors that remind you why eating matters beyond mere survival. That Sunday afternoon spent making tamales isn’t lost time; it’s an investment in six days of meals that nourish both body and soul. Your future self—the one who’s exhausted on Wednesday evening and needs dinner on the table in five minutes—will thank you profoundly. These tamales are proof that meal prep doesn’t mean sad, bland food. It means tradition. It means love. It means feeding yourself like you matter, because you do.
Happy Cooking!
Related Post
Cracker Barrel Meatloaf Recipe – Whisk GuideCracker Barrel Meatloaf Recipe – Whisk Guide
Let’s face it, a delicious meatloaf deserves an equally satisfying sidekick. When I think about pairing with Cracker Barrel meatloaf, my mind goes straight to creamy mashed potatoes. The buttery
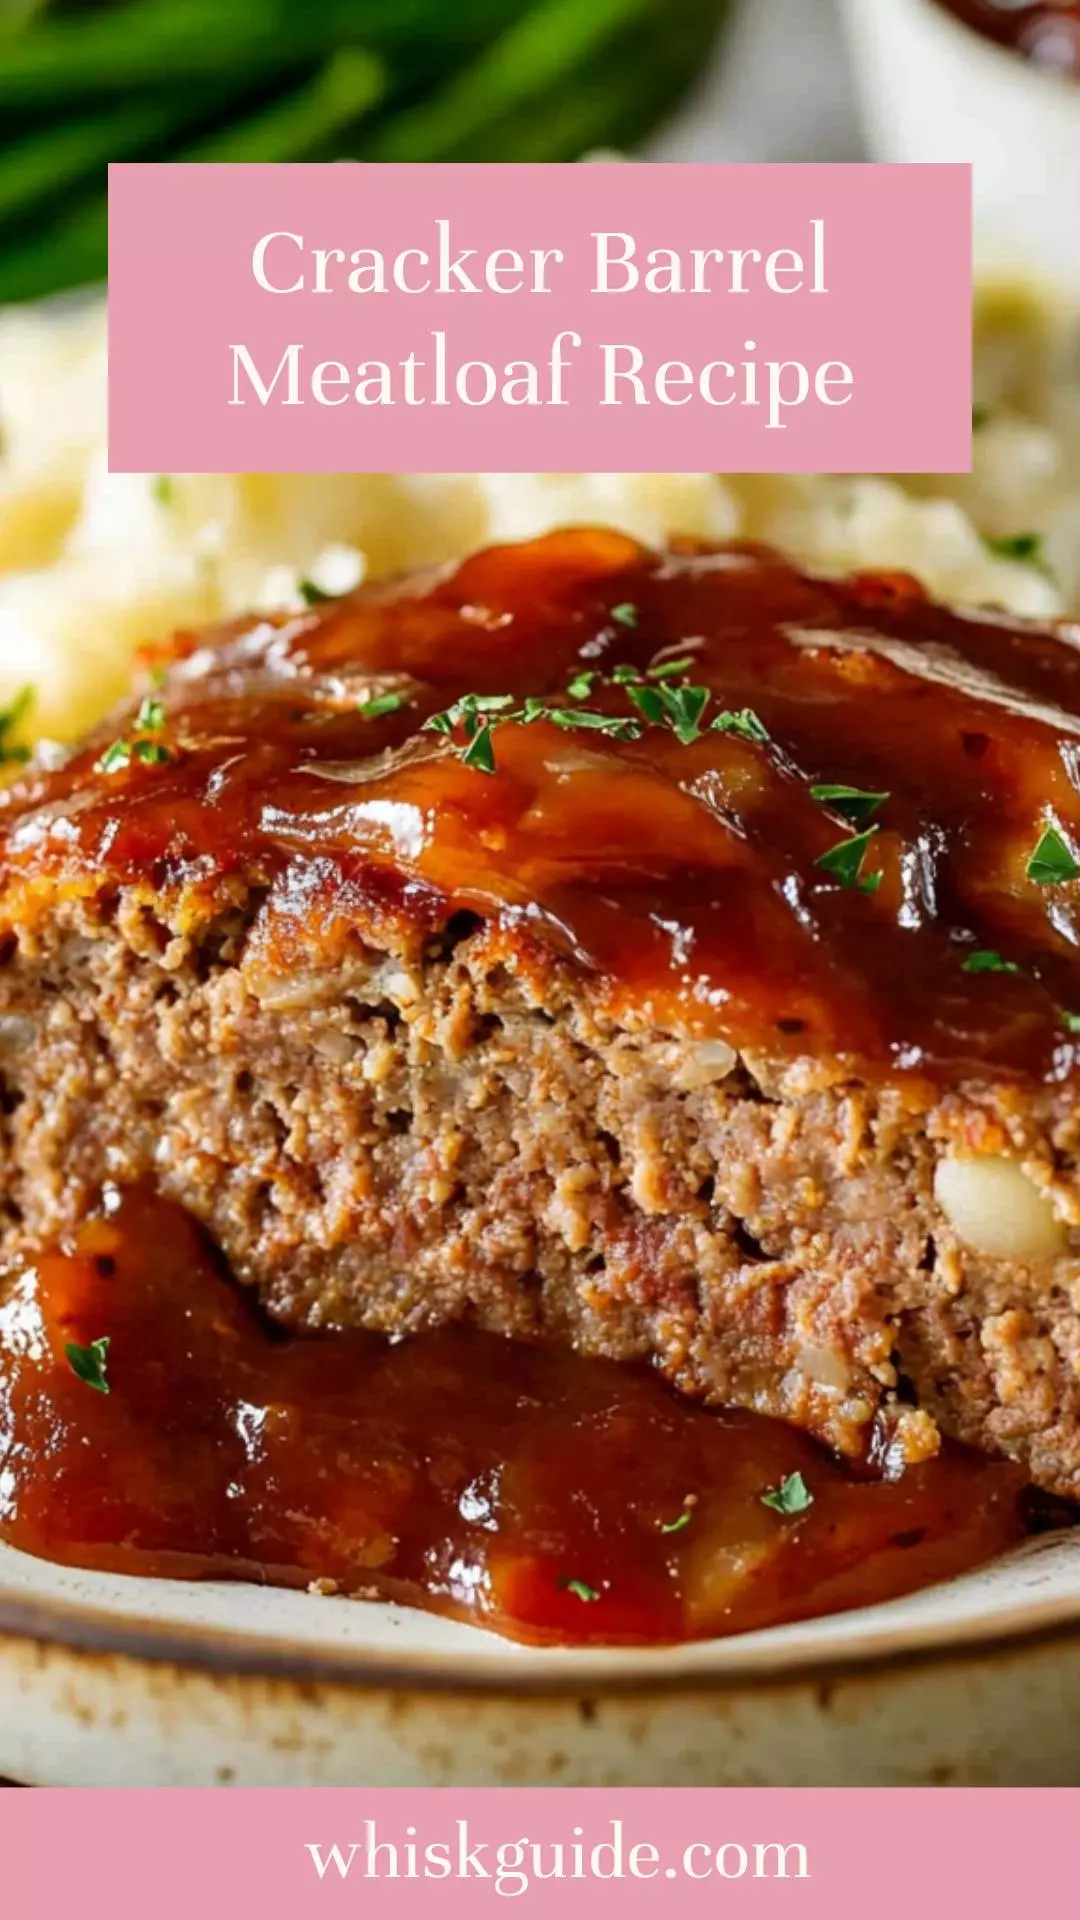
Cracker Barrel Meatloaf Recipe – Whisk GuideCracker Barrel Meatloaf Recipe – Whisk Guide
When I think of comfort food, meatloaf instantly comes to mind. There’s just something undeniably satisfying about a slice of meatloaf, served hot from the oven, that warms your soul.

Vegetarian Chicken Noodle Soup – Whisk GuideVegetarian Chicken Noodle Soup – Whisk Guide
If you’re planning on whipping up a delightful pot of Vegetarian Chicken Noodle Soup, consider what you’d like to accompany it. A crusty loaf of French bread will soak up