Ingredients
Method
Step 1: Prepare Your Corn Husks (30 minutes active, mostly waiting)
- Fill a large bowl or your kitchen sink with very hot water—as hot as your tap water goes, ideally around 140°F. Submerge all 8 ounces of dried corn husks and weight them down with a plate so they stay underwater. Set a timer for 30 minutes. While they soak, you're going to prepare your fillings (if making them fresh) and set up your workspace. This is the perfect time to identify your three filling options, because once the husks are ready, you won't have much idle time.

Step 2: Prepare Your Fillings in Advance (varies, ideally done the day before)
- This is where meal prep wisdom comes in: make your fillings the day before if you can. Seriously. Cold fillings are easier to work with, and you'll move faster during the assembly phase. For red chili beef, slow-cook shredded beef in a deep red chile sauce for richness and authenticity. For salsa verde chicken, poach chicken breasts in salsa verde broth. For the bean and cheese filling, mash refried beans and mix with shredded cheese. Portion each filling into separate containers so you can grab what you need during assembly. My professional tip: keep each filling slightly warm (not hot) during assembly—it spreads more easily onto the masa.
Step 3: Beat the Lard Until Fluffy (10-15 minutes)
- Use an electric mixer for this step—your arm will thank you. Place the room-temperature lard into a large mixing bowl and beat on medium-high speed with 2 tablespoons of your warm broth. Beat for 3-5 minutes until the mixture becomes pale, fluffy, and almost doubled in volume. This is crucial. The air you're incorporating here is what makes tamales light and tender instead of dense. You should see visible texture change—it'll go from solid fat to mousse-like consistency. This is non-negotiable for authentic texture.

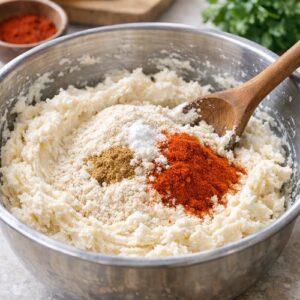
Step 4: Combine Dry Ingredients and Mix (5 minutes)
- In a separate bowl, whisk together the masa harina flour, baking powder, salt, cumin, and smoked paprika. Add this dry mixture to your fluffy lard and beat on medium-high speed for 2-3 minutes until well combined. The mixture will be crumbly at this point—that's exactly what you want. Don't panic; we're about to add liquid to develop it into dough.
Step 5: Create the Perfect Dough Consistency (8-10 minutes)
- Add your broth very slowly, a few tablespoons at a time, while beating on high speed. This isn't like bread dough. You want the final consistency to spread like creamy peanut butter—soft, pliable, slightly sticky to the touch, but not wet. Keep beating after each addition. This whole process should take 8-10 minutes of beating on high. The extended beating develops the gluten in the masa, creating that tender yet slightly springy texture. Test the consistency by dropping a small spoonful into cold water—it should float immediately when fully beaten. If it sinks, keep beating. Once correct, cover the mixing bowl with a damp paper towel to prevent it from drying out as you work.
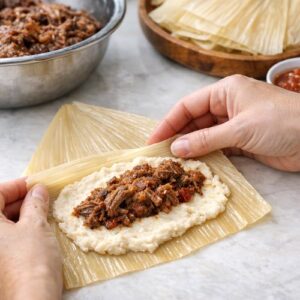
Step 6: Assemble Your Tamales (90-120 minutes for 28-32 tamales)
- Now for the meditative part. Remove husks from the water one at a time—they tear easily when wet. Lay each husk glossy side up on your counter with the wide end facing the top. Scoop approximately ¼ cup of masa dough onto the center-top portion of the husk. Here's my professional hack: lay a piece of plastic wrap over the dough and use your hands to gently press and spread the masa into a thin, even layer about ¼ inch thick. This keeps your hands clean and gives you better control than trying to spread with a knife. Keep the dough on the top half of the husk, leaving the bottom wide and clear for folding. Remove the plastic wrap. Place 1-2 tablespoons of your chosen filling in a line down the center of the dough layer. Resist the urge to overfill—too much filling makes folding difficult and creates uneven cooking. Fold one long side of the husk over the filling, then fold the other long side over it, slightly overlapping like closing a brochure. Fold the tapered bottom of the husk upward. The open end stays at the top. If you're using multiple fillings and want to track them, you can tie a thin strip of corn husk around each tamale, but it's optional.
Step 7: Set Up Your Steaming System (10 minutes)
- You have two excellent options here: a traditional steamer pot or an Instant Pot. Both work beautifully. Pour about 1 cup of water into your Instant Pot, or 3-4 cups into a steamer pot—you want water below the steaming rack but not touching the tamales themselves. Lay down a layer of extra soaked corn husks or crumpled parchment paper on the steaming rack to keep the tamales from falling through or making contact with boiling water. This prevents a common beginner mistake: soggy bottoms.
Step 8: Load and Steam (45-60 minutes for steamer pot, 25 minutes for Instant Pot)
- Stand your assembled tamales upright with the open end facing up, packed snugly enough that they support each other but not so tightly that steam can't circulate. For a stovetop steamer: bring water to a rolling boil, then reduce to a simmer and steam for 45 minutes to 1 hour. The masa should pull away cleanly from the husk when done. For an Instant Pot: cook on manual/high pressure for 25 minutes, allow natural pressure release for 10 minutes, then quick release. Both methods work equally well—choose based on your equipment and time preference.

Step 9: Test for Doneness (5 minutes)
- This is the step that separates perfectly cooked tamales from slightly underdone ones. Carefully remove one tamale from the steamer and let it cool for 1-2 minutes. Try to pull the corn husk away from the masa. If the husk pulls away cleanly and the dough doesn't look wet or sticky, you're done. If there's still visible moisture or the dough sticks to the husk, steam for 5-10 minutes longer and retest. Undercooked tamales are disappointing; overcooked ones are still delicious but slightly drier. I always err on the side of a few extra minutes.
Step 10: Cool Before Storage (30-60 minutes)
- Remove all tamales from the steamer and let them rest in the open air for 30-60 minutes before refrigerating. This prevents condensation from making them soggy. They'll still be quite warm after 30 minutes, which is fine—just ensure they're not piping hot when they go into the refrigerator, or they'll create steam that promotes moisture buildup.