3 Ingredient Fondant Recipe – Whisk Guide
Let me tell you, every time I whip up a batch of rich chocolate cupcakes or bake a stunning birthday cake, I always dream of dressing it up with some homemade fondant. The moment I pour icing on top and add cute fondant decorations, it’s pure magic!
I’ve tried many kinds of icing, but fondant has an unmatched appeal. The way it can be shaped and colored just right—it’s the perfect canvas for any cake lover’s imagination.

Today, I want to share my go-to, super easy 3-ingredient fondant recipe! Whenever I have a special occasion coming up, I look for quick and convenient ways to elevate my desserts. This recipe has saved me numerous times during holidays and celebrations.
You’ll see how straightforward it is to make with just three ingredients—trust me, you won’t believe how simple!
You Might Like These Recipes!
Vegan Fat Elvis Ice Cream Recipe
What is 3 Ingredient Fondant Recipe?
This fondant is a sweet, pliable icing that can be rolled out and used to cover cakes or shape into decorative pieces. With mini marshmallows as its base, the flavor is sweet and your cakes will turn out looking professionally decorated. This fondant isn’t just easy to make; it’s also forgiving, giving you plenty of room to play and get creative with it’s texture and color.
What Does It Taste Like?
So, how does this delightful creation taste? Imagine biting into a beautifully decorated cake only to find a light, sweet layer that melts in your mouth. It’s not overly sugary, thanks to the marshmallows, and adds a wonderful texture without overpowering the flavor of your cake. Plus, with your favorite food colors, you can make it totally unique for any theme!
Why This Recipe Works?
This 3-ingredient fondant recipe works because its primary component, mini marshmallows, melts easily to combine with powdered sugar, making it a cinch to work with. It requires minimal preparation and allows you to incorporate flavors or colors without fuss. Plus, it doesn’t harden too quickly, giving you enough time to work your magic.
Ingredients

To make this delightful fondant, you’ll need the following:
– 1 Bag (16oz / 453g) mini marshmallows (opt for a high-quality brand)
– 2-3 tablespoons water
– 4 cups (453g / 1lb) powdered sugar
– 1 tablespoon vanilla extract (for added flavor)
– Flavorless oil (to grease your hands while kneading)
This combination creates a soft and pliable dough that can be shaped to perfection!
Ingredients From : biggerbolderbaking.com
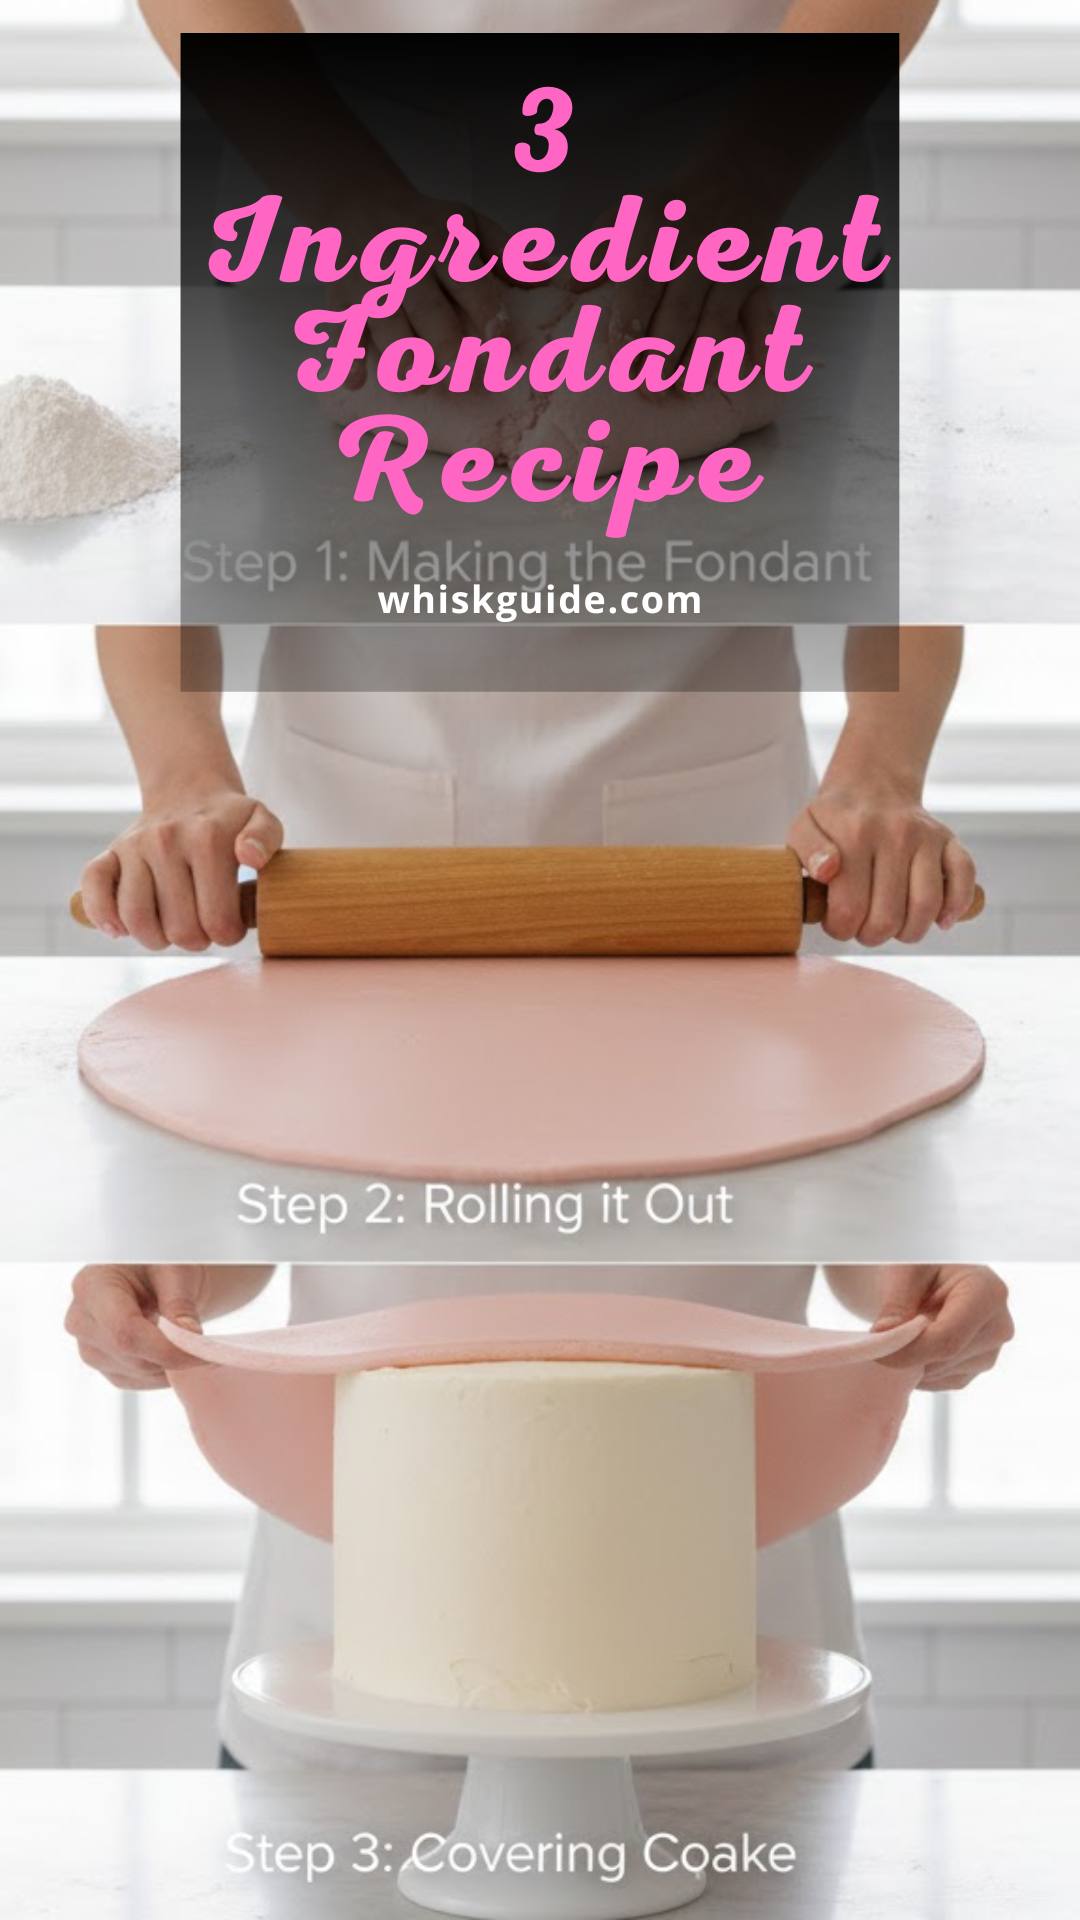
How to Make 3 Ingredient Fondant Recipe?
Let’s dive into making this fondant! I’ll walk you through each step to ensure you’re successful in creating a toppable, workable masterpiece. The magic happens quickly; keep your mixer or spatula ready!
Step-by-Step Directions
Step 1: Melt the Marshmallows

Start by melting the mini marshmallows with the water. You can opt for a double boiler or just use your microwave. If you’re using a microwave, pop the bowl in for 30 seconds at a time. After each interval, give it a quick stir. Once melted, let it sit aside for a moment.
Step 2: Incorporate the Sugar

If you’re using a mixer, pour in about three-quarters of your powdered sugar into the mixing bowl. Then add the melted marshmallow mixture on top. Mix it on low speed until you see it come together into a somewhat dense ball. If it’s still too sticky for your liking, don’t be shy—add more powdered sugar gradually.
If mixing by hand, stir in three-quarters of the powdered sugar into the marshmallow mix. You’ll work in the remaining sugar by kneading it with your hands on a counter dusted with powdered sugar.
Step 3: Kneading Time

No matter the mixing method, it’s knead time! Dump the mixture onto your clean countertop and sprinkle more sugar around it. Now, let’s really get into it—knead that dough for about 7 minutes. You want it to be soft and shiny; if it feels dry, add a half tablespoon of water at a time until it regains that sweet, pliable quality.
Step 4: Adding Color

Want to jazz it up? Grab some food coloring! Add just a tiny bit with a toothpick into the fondant, and then knead it again for about 7 minutes. Keep working until the color is evenly distributed. If it feels dry, just follow the same advice as earlier—add that water!
Step 5: Storage for Later Use

When you’re ready to store your fondant for future projects, treat your creation with care. Lightly grease the outside with oil, wrap it tightly in plastic wrap, and place it in a ziplock bag. This ensures it stays moist and ready when you are.
Step 6: Rolling and Shaping

Now comes the fun part! Roll your fondant out on a surface dusted with icing sugar. Make sure to keep moving it around so it doesn’t stick. Once it’s rolled to your desired thickness, you can shape it into fun decorations like hearts or flowers. If you’re doing cut-outs like hearts, let them air-dry a bit to firm up before decorating your cake.
Step 7: Serve and Impress
Once your fondant is ready and may it adorn your cake, you’ll be amazed at the transformation. It can last for weeks when stored properly, making it the perfect last-minute addition to bring your baked goods to the next level.
Notes
– Use quality mini marshmallows for the best flavor.
– Adjust the amount of water based on the humidity of your kitchen.
– Greasing your hands helps prevent sticking during kneading.
– Make fondant a day or two ahead for the best, freshest results.
– Experiment with different flavors in the fondant to match your cake theme!
Storage Tips
To keep your fondant fresh, always grease your creation before wrapping it tightly in plastic wrap. You can place this wrapped fondant inside an airtight container to avoid air exposure, ensuring it remains soft and pliable for future use.
Sides For 3 Ingredient Fondant Recipe
– Gorgeous Wine Cake: A splendid match for adding fondant decorations.
– Moist Chocolate Layer Cake: Elevate its look with a smooth fondant layer.
– Vanilla Cupcakes: Fondant makes adorable toppers for your cupcake creations.
– Celebration Sheet Cake: Use fondant to create a festive look for birthdays or holidays.
– Cookies: Shape fondant decorations to place on top of your favorite homemade cookies.
What are some alternative choices to the ingredients in case they are not in your pantry?
– Regular-sized marshmallows: Can replace mini marshmallows, just melt a little longer.
– Corn syrup: A great substitute for water that will add shine and flavor.
– Powdered sugar: You could use store-brand options, but always sift to ensure no lumps.
– Flavor extracts: Use almond or lemon instead of vanilla for a fun twist.
– Coconut oil: Can substitute for flavorless oil to add a hint of coconut flavor to the fondant.
3 Ingredient Fondant Recipe
Ingredients
Equipment
Method
- Start by melting the mini marshmallows with the water. You can opt for a double boiler or just use your microwave. If you’re using a microwave, pop the bowl in for 30 seconds at a time. After each interval, give it a quick stir. Once melted, let it sit aside for a moment.
- If you’re using a mixer, pour in about three-quarters of your powdered sugar into the mixing bowl. Then add the melted marshmallow mixture on top. Mix it on low speed until you see it come together into a somewhat dense ball. If it’s still too sticky for your liking, don’t be shy—add more powdered sugar gradually.
- If mixing by hand, stir in three-quarters of the powdered sugar into the marshmallow mix. You’ll work in the remaining sugar by kneading it with your hands on a counter dusted with powdered sugar.
- No matter the mixing method, it’s knead time! Dump the mixture onto your clean countertop and sprinkle more sugar around it. Now, let’s really get into it—knead that dough for about 7 minutes. You want it to be soft and shiny; if it feels dry, add a half tablespoon of water at a time until it regains that sweet, pliable quality.
- Want to jazz it up? Grab some food coloring! Add just a tiny bit with a toothpick into the fondant, and then knead it again for about 7 minutes. Keep working until the color is evenly distributed. If it feels dry, just follow the same advice as earlier—add that water!
- When you’re ready to store your fondant for future projects, treat your creation with care. Lightly grease the outside with oil, wrap it tightly in plastic wrap, and place it in a ziplock bag. This ensures it stays moist and ready when you are.
- Now comes the fun part! Roll your fondant out on a surface dusted with icing sugar. Make sure to keep moving it around so it doesn’t stick. Once it’s rolled to your desired thickness, you can shape it into fun decorations like hearts or flowers. If you’re doing cut-outs like hearts, let them air-dry a bit to firm up before decorating your cake.
- Once your fondant is ready and may it adorn your cake, you’ll be amazed at the transformation. It can last for weeks when stored properly, making it the perfect last-minute addition to bring your baked goods to the next level.
Nutrition
Notes
Tried this recipe?
Let us know how it was!FAQs
Q1: Can I use this fondant to cover a cake?
Yes! This fondant is perfect for covering cakes, just remember to roll it out to your desired thickness.
Q2: Can I color my fondant?
Absolutely! Adding food coloring is easy. Use a toothpick to add color until you achieve your desired shade.
Q3: How long does fondant last?
When properly stored in an airtight container, fondant can last for several weeks.
Q4: Is this fondant vegan-friendly?
Unfortunately, traditional marshmallows contain gelatin, which is not vegan. However, there are vegan marshmallows that can be used as a substitute.
Q5: Can I flavor my fondant beyond vanilla?
Yes! Feel free to experiment with different flavor extracts—almond, lemon, or even peppermint for a fun seasonal twist.
Conclusion
There you have it—the easiness of a 3-ingredient fondant recipe! It has saved me, time and again, whenever I find myself in need of that perfect finishing touch for my creations.
With minimal ingredients and a little bit of patience, you’ll have fondant that’s not just good but delightful! Dive in, roll it out, and let your baking creations shine. Happy decorating!
You Might Also Like These Latest Recipes!
Related Post
Pamelas Double Chocolate Brownie Recipe – Whisk GuidePamelas Double Chocolate Brownie Recipe – Whisk Guide
As a food lover, I believe that a good brownie can transform an ordinary day into something special. When it comes to the ultimate comfort food, nothing beats a rich,
Pamelas Zucchini Bread Recipe – Whisk GuidePamelas Zucchini Bread Recipe – Whisk Guide
Before we dive into the delicious details of Pamela’s zucchini bread, let me set the stage for you. Picture a warm slice of zucchini bread topped with a dollop of
Mango Fruit Leather – Whisk GuideMango Fruit Leather – Whisk Guide
Before diving into the juicy goodness of mango fruit leather, it’s essential to think about what you can pair this delightful snack with. Picture this: a warm afternoon, and you’re