Vegan Fat Elvis Ice Cream – Whisk Guide
Ah, the summer days call for a special treat, don’t they? When I think of something refreshing and indulgent that can also evoke nostalgia, Vegan Fat Elvis Ice Cream stands out. Its creamy texture and rich flavors make for a delightful dessert, but pairing it with the right accompaniments can elevate the experience to another level. Here are a few suggestions to get you started:
- Fresh Berries: Bright strawberries or blueberries bring a juicy punch. They balance the richness of the ice cream quite well. Just imagine a scoop of this ice cream with vibrant, sweet berries on the side. Bliss!
- Crushed Nuts: Sprinkle some toasted walnuts or almonds for a bit of crunch. Not only do they add texture, but they also enhance the peanut flavor in the ice cream.
- Granola: A scoop of granola mixed in can add an interesting chewiness. It’s a great way to bring in a breakfast vibe. Plus, it makes you feel a little healthier, doesn’t it?
- Chocolate Sauce: A drizzle of rich vegan chocolate sauce can turn this dessert into a rock star. The decadent chocolate pairs perfectly with the peanut butter and banana flavors.
- Waffles: Serve the ice cream between two vegan waffles for a fun take on an ice cream sandwich. It’s playful and perfect for any gathering.
- Dairy-Free Whipped Cream: If you want to take things a notch higher, a dollop of homemade vegan whipped cream can add a fluffy touch that complements the creaminess of the ice cream.
Now that we have our pairings sorted, let’s dive into the delightful world of Vegan Fat Elvis Ice Cream.

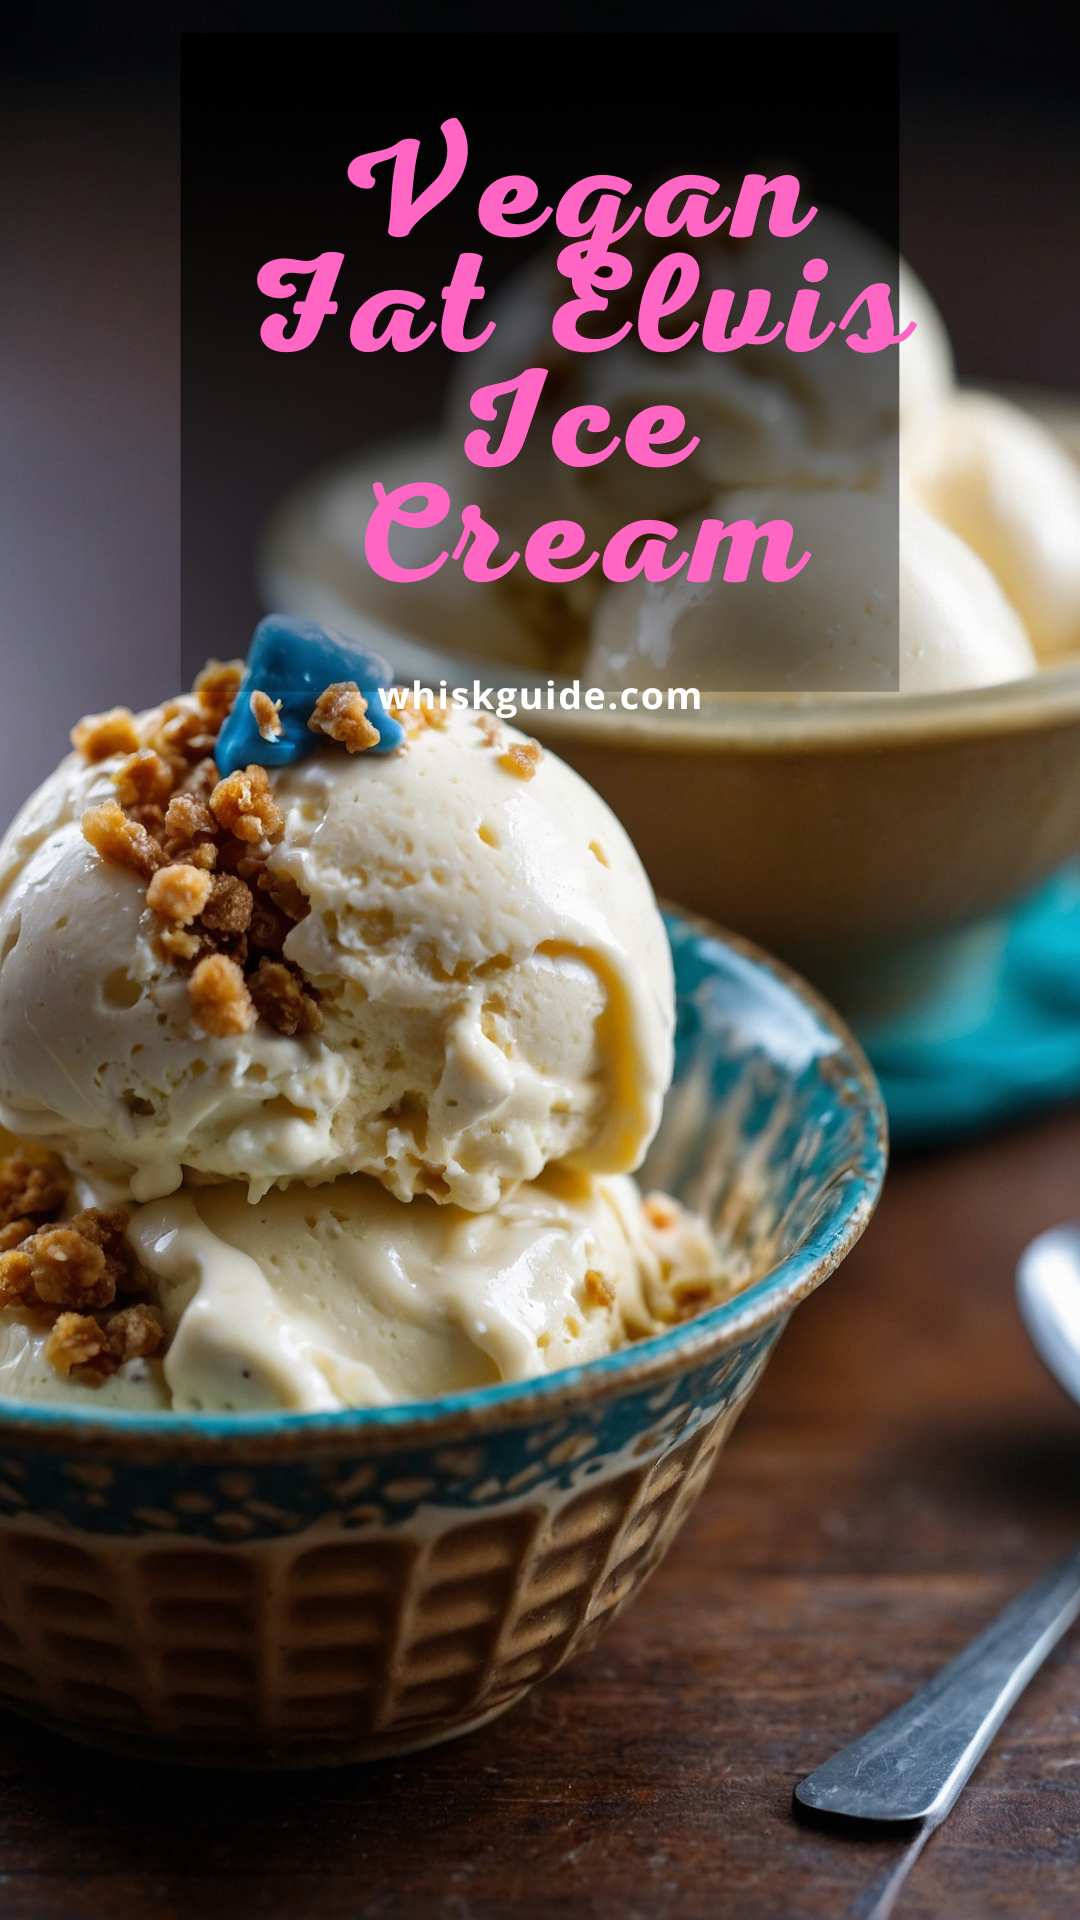
Hello, fellow dessert lovers! When it comes to satisfying a sweet tooth while keeping it plant-based, Vegan Fat Elvis Ice Cream hits the spot. Inspired by the legendary Elvis Presley, this ice cream combines rich, creamy peanut butter, sweet ripe bananas, and a hint of chocolate. Let me tell you right now: this isn’t just another vegan recipe. This frozen treat brings together nostalgia and nutrition in a way that feels like a warm hug on a hot day.
I have always been a fan of Elvis-themed treats. Perhaps it’s the charisma of the King himself or the delightful combination of fabrics he wove into his life (think peanut butter and banana sandwiches). This dessert embodies that spirit but with a twist that’s kind to the planet and your body.
Making this ice cream is surprisingly simple. With just a handful of wholesome ingredients, you can whip up a dessert that tastes indulgent but is free from any animal products. That sounds like a win to me!
You Might Also Like These Recipes!
My Experiences with the Ingredients
As I gathered ingredients for this recipe, I found myself reminiscing about the flavors of my childhood—peanut butter and bananas were staples in my home. My mom’s luscious banana bread was always a treat, but now, I’ve taken that love for bananas and combined it with my passion for plant-based living.
Let’s chat about the ingredients:
- Bittersweet Chocolate: This will be our star when it comes to flavor. That little bit of chocolate not only deepens the taste but also creates a beautiful visual contrast. I love how it melts into the creaminess of the banana and peanut butter.
- Creamy Peanut Butter: Oh, peanut butter! A staple in my pantry. Smooth and delicious, it brings a creamy texture to our ice cream. You might not know this, but it’s also all about nostalgia for me. It reminds me of rainy afternoons spent crafting sandwiches.
- Ripe Bananas: The riper, the better! When bananas are at their sweetest, they’re perfect for pureeing. I sometimes have a banana party when I find a bunch that has turned spotty. My family knows to watch out—the next batch of banana treats is coming their way!
- Eggs: You heard that right! We’ll lightly whisk these in. They add structure; however, if you’re strictly vegan, you can skip these or use a substitute. You know what’s good for binding? Flax eggs!
- Heavy Cream & Half-and-Half: To keep it rich and satisfying. You can opt for coconut cream if you’re looking for a coconut twist. This switch really adds an interesting dimension to the flavor.
- Evaporated Milk: I love using this because it intensifies flavors.
- Granulated Sugar & Vanilla Extract: Let’s just say, sugar and vanilla are like the dynamic duo when it comes to desserts. They enhance everything!
I’m eager to share this recipe, so let’s hop into it!
Ingredient List
Here’s what you’ll need for Vegan Fat Elvis Ice Cream:
- 3.5 oz bittersweet chocolate, chopped
- ½ cup creamy peanut butter
- ⅓ cup chopped peanut butter cups (vegan variety, of course)
- 1 cup ripe banana puree (about 2 bananas)
- 2 large eggs, lightly whisked (optional)
- 2 cups heavy cream (or coconut cream for a non-dairy option)
- 2 cups half-and-half cream (or almond/cashew milk)
- 6 oz evaporated milk, split between the steps
- 1 ¼ cups + 2 tablespoons granulated sugar, divided
- ½ tablespoon pure vanilla extract
- 1 pinch fine sea salt
- 1 teaspoon instant coffee granules (optional)
- 1 teaspoon ground cinnamon (optional)
How to Make Vegan Fat Elvis Ice Cream
Step 1: Prepare the Base
Start by melting the bittersweet chocolate in a heatproof bowl placed over a simmering pot of water. Stir it until smooth, then remove it from the heat and let it cool slightly. Meanwhile, in a large bowl, combine the peanut butter, banana puree, and half of the sugar.
Step 2: Combine the Creams
In another bowl, whisk together the heavy cream and half-and-half. If you’re using coconut cream, just ensure it’s fully cooled and mixed well. This mix provides a great rich texture to your ice cream.
Step 3: Whisk the Eggs
If you’re using eggs, whisk the lightly beaten eggs in a separate bowl. Once they are smooth, add them to the peanut butter and banana mixture. If you’re avoiding eggs, skip this step and proceed with the next one.
Step 4: Mix Everything Together
Combine the peanut butter mixture with the cream mixture, stirring gently. This step is crucial, as you want to blend these ingredients without overmixing. Once combined, add the melted chocolate, remaining sugar, vanilla extract, and salt. Stir until everything is smooth.
Step 5: Add Optional Ingredients
Toss in the ground coffee granules and cinnamon if you’re using them. These options are entirely up to you. The coffee enhances the chocolate flavor and the cinnamon adds warmth. Stir until blended.
Step 6: Churn the Mixture
Pour the batter into your ice cream maker. Follow the manufacturer’s instructions for churning. This process usually takes around 20-25 minutes. You’ll know it’s done when it has a soft serve consistency.
Step 7: Freeze and Enjoy
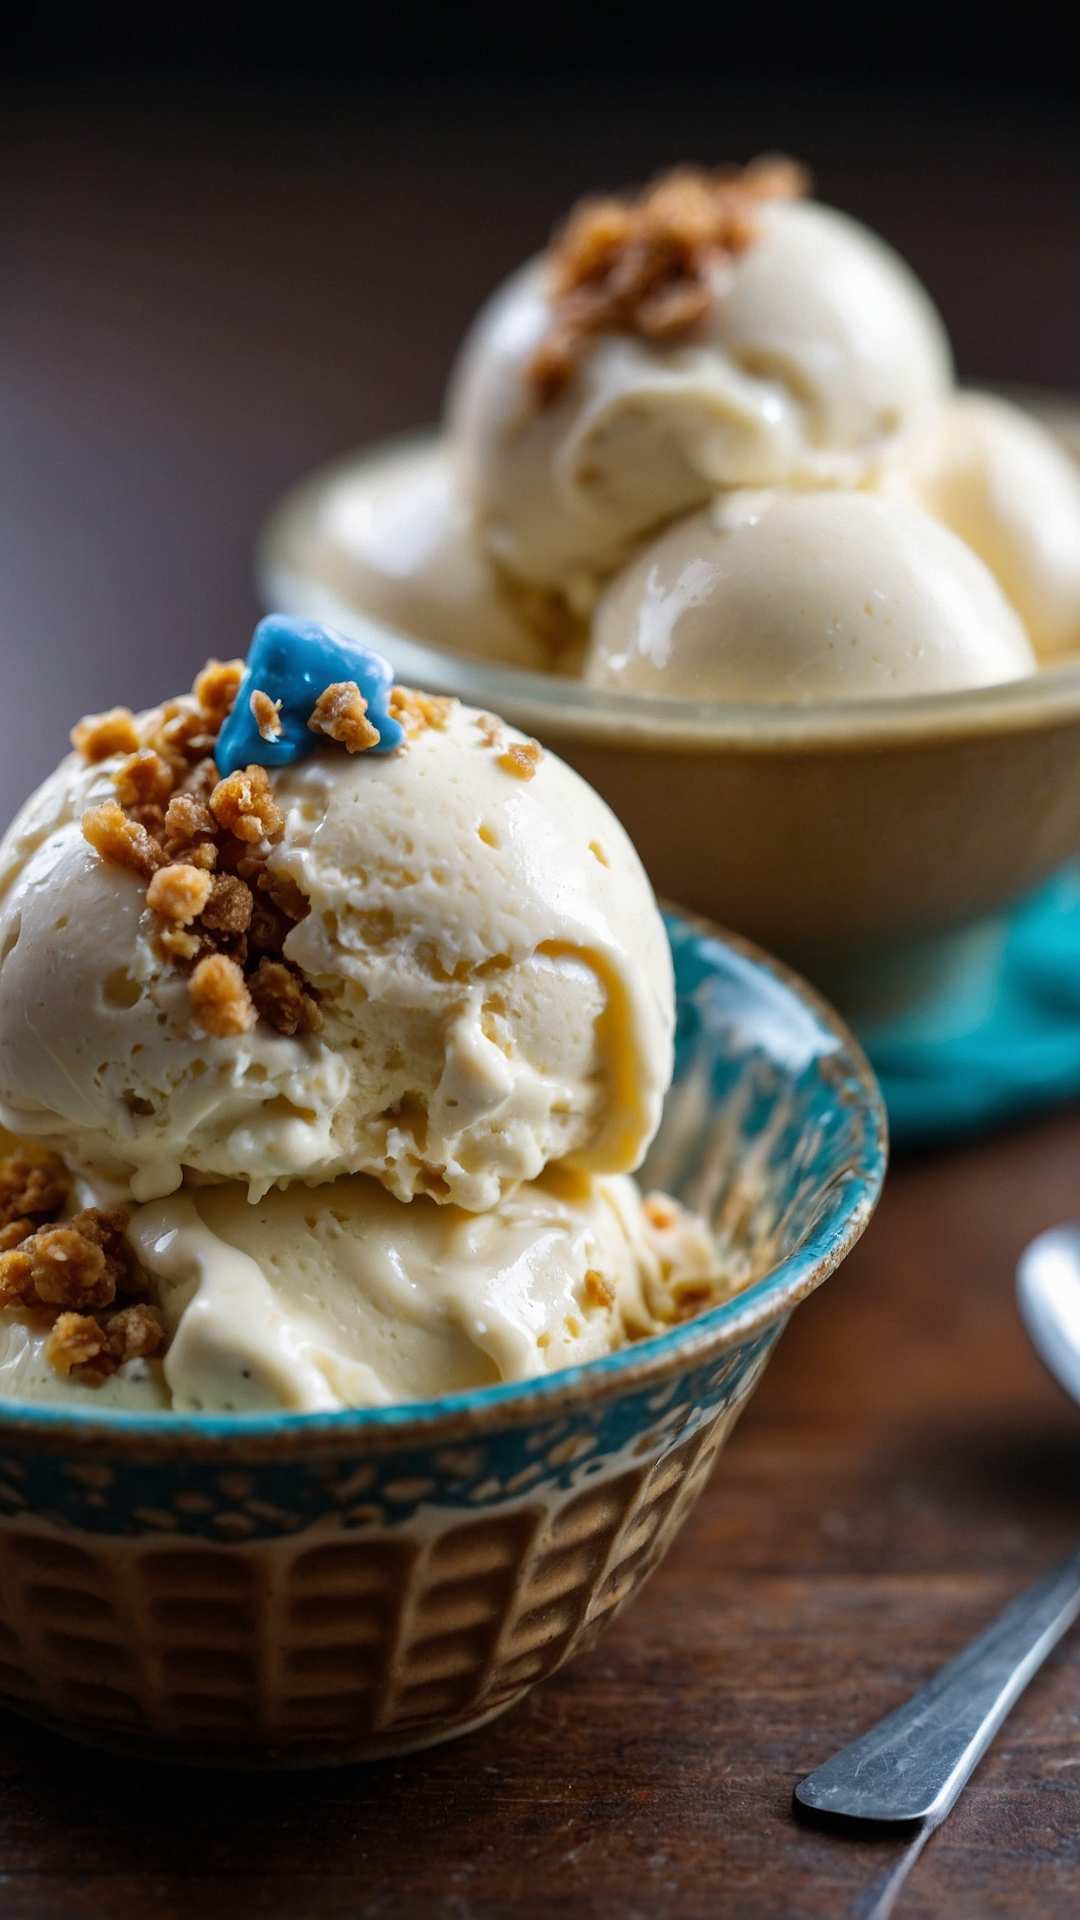
Transfer the ice cream into an airtight container and freeze it for at least 4 hours, or until fully firm. Trust me, the wait is worth it! Once it’s frozen, scoop and serve with your favorite toppings.

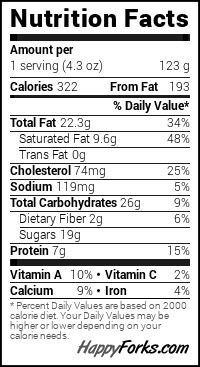
Nutrition Information
Recipe Notes
- Bittersweet Chocolate: This adds depth to the flavor. You can swap it with dark chocolate if you enjoy a more intense taste.
- Creamy Peanut Butter: Opt for organic varieties for minimal additives. If you have allergies, almond or sun butter can be a great alternative.
- Banana Puree: Make sure your bananas are very ripe. This is where all the flavor comes from.
- Eggs: While they add richness, they are optional. Additionally, a great substitute for eggs is a flax egg (1 tablespoon of flaxseed meal mixed with 2.5 tablespoons of water).
- Essential Creams: Heavy cream makes it thick and creamy. If you’re looking for a lower-fat option, non-dairy alternatives like cashew or oat milk can work.
- Sugar: This is adjustable. You can lessen it or explore alternatives like maple syrup or agave nectar.

Recipe Variations
- Nut-Free Option: Swap out peanut butter for sun butter or tahini, and use sunflower seeds instead of peanut butter cups.
- Chocolate Lovers: Increase the amount of bittersweet chocolate for an even richer taste. You might try adding chocolate chips into the ice cream base for extra fun.
- Fruit Explosion: Mix in some chopped strawberries or other fruits for a fruity twist. They’ll add a fresh bite to the rich flavors.
- Extra Creamy: For an ultra-creamy treat, you could incorporate more coconut cream instead of regular cream.
Vegan Fat Elvis Ice Cream
Ingredients
Equipment
Method
- Start by melting the bittersweet chocolate in a heatproof bowl placed over a simmering pot of water. Stir it until smooth, then remove it from the heat and let it cool slightly. Meanwhile, in a large bowl, combine the peanut butter, banana puree, and half of the sugar.
- In another bowl, whisk together the heavy cream and half-and-half. If you’re using coconut cream, just ensure it’s fully cooled and mixed well. This mix provides a great rich texture to your ice cream.
- If you’re using eggs, whisk the lightly beaten eggs in a separate bowl. Once they are smooth, add them to the peanut butter and banana mixture. If you’re avoiding eggs, skip this step and proceed with the next one.
- Combine the peanut butter mixture with the cream mixture, stirring gently. This step is crucial, as you want to blend these ingredients without overmixing. Once combined, add the melted chocolate, remaining sugar, vanilla extract, and salt. Stir until everything is smooth.
- Toss in the ground coffee granules and cinnamon if you’re using them. These options are entirely up to you. The coffee enhances the chocolate flavor and the cinnamon adds warmth. Stir until blended.
- Pour the batter into your ice cream maker. Follow the manufacturer’s instructions for churning. This process usually takes around 20-25 minutes. You’ll know it’s done when it has a soft serve consistency.
- Transfer the ice cream into an airtight container and freeze it for at least 4 hours, or until fully firm. Trust me, the wait is worth it! Once it’s frozen, scoop and serve with your favorite toppings.
Nutrition
Notes
- Bittersweet Chocolate: This adds depth to the flavor. You can swap it with dark chocolate if you enjoy a more intense taste.
- Creamy Peanut Butter: Opt for organic varieties for minimal additives. If you have allergies, almond or sun butter can be a great alternative.
- Banana Puree: Make sure your bananas are very ripe. This is where all the flavor comes from.
- Eggs: While they add richness, they are optional. Additionally, a great substitute for eggs is a flax egg (1 tablespoon of flaxseed meal mixed with 2.5 tablespoons of water).
- Essential Creams: Heavy cream makes it thick and creamy. If you’re looking for a lower-fat option, non-dairy alternatives like cashew or oat milk can work.
- Sugar: This is adjustable. You can lessen it or explore alternatives like maple syrup or agave nectar.
Tried this recipe?
Let us know how it was!Frequently Asked Questions
1. Can I make this ice cream without an ice cream maker?
Absolutely! If you don’t have an ice cream maker, pour the mixture into a flat container. Freeze it and stir every 30 minutes to break up the ice crystals for about 3-4 hours. This will still yield a delightful treat.
2. How long will it last in the freezer?
When stored properly in an airtight container, Vegan Fat Elvis Ice Cream can last up to 2-3 weeks in the freezer. But let’s be real, it’ll probably be gone before that!
3. Can I use frozen bananas instead?
Yes, frozen bananas work splendidly. They should be thawed a bit for easier blending. They provide a creamy base that’s hard to resist!
4. Is it possible to make this recipe sugar-free?
Certainly! You can use sugar substitutes, like stevia or monk fruit sweetener, for a sugar-free version. Just be cautious about adjusting the amounts since they vary from regular sugar in sweetness.
5. What’s the best way to serve Vegan Fat Elvis Ice Cream?
Serving it scooped into bowls with your chosen toppings is delightful. You could also serve it in between two soft cookies for a tasty sandwich!
6. How can I adjust this recipe to make it gluten-free?
The ingredients listed are naturally gluten-free. Just make sure any extras, like peanut butter cups or chocolate chips, are gluten-free.
Conclusion
Vegan Fat Elvis Ice Cream is truly a celebration of flavors that are familiar yet stunning. It checks the boxes for being fun, nostalgic, and absolutely satisfying. The texture is creamy, the taste is rich with bursts of chocolate and peanut butter, and the added banana makes it feel indulgent.
With just a bit of effort and a few simple ingredients, you’ve got a treat that can impress at summer gatherings or serve as a delightful treat during a chill movie night. Your taste buds will thank you, and your friends will want to know your secrets!
Now that you’ve got this recipe under your belt, I hope you dive into your kitchen and let the deliciousness unfold. After all, dessert should be a celebration! So, grab your spoon and enjoy every bite of this frozen delight.
You Might Also Like These Latest Recipes!
Related Post

Pamelas Gluten Free Gingerbread Recipe – Whisk GuidePamelas Gluten Free Gingerbread Recipe – Whisk Guide
Before diving into the delicious world of Pamela’s gluten-free gingerbread, let’s set the stage. When you pull a warm loaf from the oven, you want to enhance that experience, right?
3 Tier Carrot Cake Recipe – Whisk Guide3 Tier Carrot Cake Recipe – Whisk Guide
Growing up, nothing made my heart sing quite like a three-tier carrot cake. I remember my birthday parties, where my mom would insist on serving that towering masterpiece. Friends would

Pamela’s Gluten Free Carrot Cake Recipe – Whisk GuidePamela’s Gluten Free Carrot Cake Recipe – Whisk Guide
When it comes to desserts, pairing is everything. Just imagine slicing a piece of Pamela’s Gluten-Free Carrot Cake and serving it alongside a warm cup of chai tea. The spices